Configuring the v1 API in Influx 2.0.2+ for use with Grafana 7+
This post walks through how to configure the v1 API in InfluxDB v2.0.2 for use in Grafana 7+. This took a lot of trial and error, and really wasn’t clear in the Influx documentation - and definitely not all in the same place. The situation I found myself in is that I have many dashboards in Grafana built against Influx 1’s InfluxQL, and would really like to point ALL of my reporting agents to my new InfluxDB 2.0 installation and not have to worry about rewriting all of the dashboard queries immediately in Flux.
Enable v1 Mappings for Retention Policies
For Grafana to send v1 InfluxQL queries against a v2 bucket, it needs to look like the older database. In v1, databases had retention policies. Begining with Influx CLI v2.0.2 the ‘influx v1 dbrp’ command is included.
Create a profile config
If you haven’t created your personal Influx config file, do that now to make life easier:
influx config create -n default -u http[s]://<yourInfluxURL>:<port> -o <Organization> -t <authenticationToken>
Each time that you use the ‘influx’ command, it will reference the values in this config files to communicate with InfluxDB.
Create a DBRP
Create a new database retention policy (dbrp) for your bucket. It doesn’t seem to matter what the name of the rp is, so long as it’s there and marked as the default:
influx v1 dbrp create --db MyDatabase --rp MyDatabase-rp --bucket-id <bucketID>
See Influxdata.com documentation for dbrp and influx v1 dbrp cli
Add v1 User to Bucket/Database
This will use your token for authorization to create a user named “readOnlyUser” with read access to only the bucket ID specified:
influx v1 auth create --username readOnlyUser --read-bucket <bucketID>
You will be prompted to enter and confirm a password for the new username.
You can then verify accounts that exist with the command:
influx v1 auth list
Test the API with curl
Use curl to test a request to the v1 API endpoint. Token authentication works like this:
curl --request POST http[s]://<yourInfluxURL>:8086/query --header "Authorization: Token <authenticationToken>" --data-urlencode "q=SHOW DATABASES"
This should result in a json string listing all databases/buckets that you have created a dbrp for, similar to this:
{"results":[{"statement_id":0,"series":[{"name":"databases","columns":["name"],"values":[["MyDatabase"]]}]}]}
Add as a Datasource to Grafana
In Grafana on the Datasources page, choose to add a new InfluxDB datasource.
Give your datasource a name, and select InfluxQL as the query language.
For the URL, enter http[s]://<yourInfluxURL>:8086 and leave Access as “Server”
Under the Auth section leave Basic auth off. And if you’ve enabled TLS on Influx but your Grafana server will not trust the certificat on it, enable the ‘Skip TLS Verify’ option.
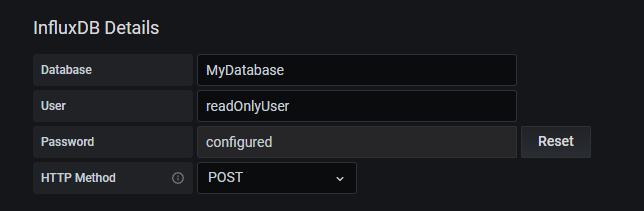
Under InfluxDB Details enter the name of your database, the username, and password for the account. Contrary to the Influx documentation, use the POST method with the v1 datasource.
Click Save & Test